

The New G-Technology ArmorLock Encrypted Drive
Posted by Phil Baker on

The ArmorLock Encrypted NVMe SSD
Introducing G-Technology's new revolutionary security platform
Our data privacy is constantly being threatened these days. If your data was lost, stolen, or leaked to the public, that's months of hard work in pre-production, budgets, crews, and careers all jeopardized. We've seen encrypted drives before, but that's all high security without the ease of use. G-Tech's ArmorLock aims to fix all of this. Their ArmorLock app makes it quick and easy to encrypt, track, protect, and give your drive access to just the right people. So all of your hard work never falls into the wrong hands.
Key Features
- No Passwords!
The ArmorLock App keeps things safe and secure by using your iPhones biometric authentication software to quickly access your content. - Multi-user Access
Authenticate them in the app and pass access via email to keep the content secure and efficient in continuing the work flow in multiple work places, with multiple users. - Usage Logs
One of the many functions of the ArmorLock App. You can also see when the drive was last used so that you can be sure that you are finished with your content before erasing. - Auto-Locking
Once the ArmorLock Encrypted NVMe SSD is ejected, it auto-locks itself to ensure security of the information on hand. - Fast Transfer Speeds
Read and write speeds of up to 1000MB/s - Physical Protection
3-meter drop protection***, 1,000- pound crush resistance, and IP67 dust and water resistance for on location mishaps.
Drive Compatibility
- Windows 10+
- Mac OS X 10.12+
App Compatibility
- Mac OS X 10.12+
- iOS 13.4+
Setting Up
Getting started is a simple and easy task. Download the ArmorLock App from your iPhones app store. Plug your new ArmorLock Encrypted NVMe SSD in via the Usb-c or Thunderbolt 3 port on your computer.

Launch the ArmorLock App on your iPhone. Select Add drive and scan the QR code on the back of the drive. Now you want to select Erase, then Setup as New.
In this setup screen there are a few different items to set; Create a drive name, Select a color identifier, Format preference, Location tracking, as well as more advanced settings described within the user manual.

For now lets click format drive, one of the last available options. Print the generated recovery key *QR code* as a failsafe in case you are locked out of your drive. Congratulations, your new drive is now setup!
The newly synced drive will show in the list of available drives successful synced and added via the app. Click unlock and the drive should now appear on your desktop under its designated name.
If you need to change any of the drive settings, select the drive and look for the settings gear in the top right. This will navigate you back to this management page.
Authorizing Other Local Phones
All ArmorLock Encrypted NVMe SSD functions require the use of both the app and an iPhone with the compatible iOS. Remember this when developing a network of usage for your newly purchased drive or drives.

Authorizing other phones is much like the initial setup of the drive itself. Select add drive and ensure the drive is plugged in. At this point, both phones must be in the same Bluetooth vicinity of the drive.
The user requesting access can scan the QR code on the back of the drive, then selecting request access from the menu. Keep this QR screen open and on hand for later steps.
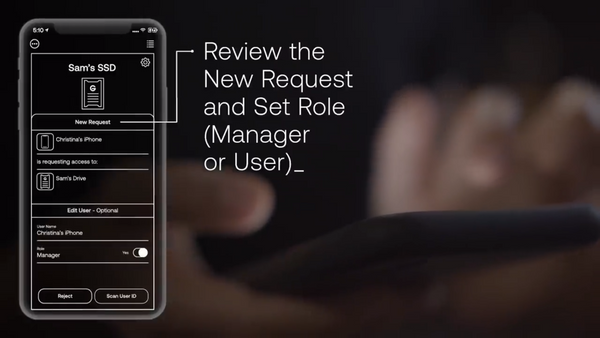
We now move to the drive managers phone to follow through with the request process. Within the app, navigate to the drive with the request of access notification, make sure the request is from the appropriate person and designate the role of manager or user for those requested.
Then either Reject or select Scan User ID and scan the QR code on the open page of the phone of who is requesting access. This process ensures that you know who has access to you drive and content at all times.
Authorizing Remote Users Before Shipping
Sometimes we need to pass work off and along to the next person, for the next stage of a projects life. This process can already be critical as much as it crucial to the end user. Luckily the ArmorLock Encrypted NVMe SSD has the capability to authorize someone that isn’t in your immediate area so that they can access the drive once they receive the project.

As the user requesting access, download the app and select the main menu from the top left corner. Select the option Share User ID and Send User ID. Lastly, choose how to send your ID to the appropriate drive manager.
As the drive manager, click the link to add the user to the their list within the app. Navigate to the desired drive and select the drive settings in the top right corner. Select the Manager Settings option, then Authorize Users.

From here click the add button in the top right corner and select the user you want to authorize with access. Select their role as user or manager, select authorize, and you have now authorized a remote user.
Remember that the remote user must have access to a compatible iPhone for the use of this drive remotely, just as the manager must. The Remote User must add the drive and scan the QR code on the drive just as the Manager must for setup.
Purchase an ArmorLock Drive today!
Share this post
- 0 comment
- Tags: Computer, g-technology, Hard Drive, HardDrive, review